Docker Desktop 4.3.0以降できなくなったCentOS7コンテナでのsystemdの利用をlima+dockerで使える環境を用意した

前回記事でlimaのセットアップをしたので、これを利用してlimaインスタンス上でCentOS7コンテナのsystemdを利用することにした。

なんでlima+dockerでやるの?

自分は今までDocker Desktopを使っており、CentOS7コンテナのsystemdは普通に利用してきた(--privilegedつけたり/sbin/initでdocker runしたりするあれ)。 しかし、 Docker Desktop 4.3.0以降はこれができなくなった

Docker Desktop for Mac release notes | Docker Documentation

  • Docker Desktop now uses cgroupv2. If you need to run systemd in a container then:
    • Ensure your version of systemd supports cgroupv2. It must be at least systemd 247. Consider upgrading any centos:7 images to centos:8.
    • Containers running systemd need the following options: --privileged --cgroupns=host -v /sys/fs/cgroup:/sys/fs/cgroup:rw.

Docker Desktopでcgroup v2を使うようにした関係で、cgroup v1を使っているとsystemdを実行することができなくなっている。 CentOS7は cgroup v1なのでこれに引っかかって動かない。 上記でも「cgroup v2をサポートしているsystemd 247以上を使う必要あり。centos:7はcentos:8などcgroup v2が使えるOSイメージへ移行して--privileged --cgroupns=host -v /sys/fs/cgroup:/sys/fs/cgroup:rwをつけてコンテナを起動すること。」と書かれている。

自分の場合、CentOS7イメージでsystemdを起動できるコンテナを使う場面がまだ必要で、Docker Desktop以外で利用する手段がほしいところ。 というわけで前回記事でlimaを使えるようにしたことを活かして、cgroup v1が使えるlimaインスタンスを構築してCentOS7コンテナのsystemdを使えるようにした。

先にMacOS環境にdocker clientをインストールしておく

Docker Desktopはアンインストールして、docker clientをインストールしておく。

ref : Install Docker Engine from binaries | Docker Documentation

簡単にlimaインスタンスを構築できるyamlファイルを用意した

やったことをいろいろ説明する前に成果物を見せちゃおう。 limactl startインスタンスを作成するときにいい感じにprovisionしてくれるyamlを作成した。 私のリポジトリで公開しているのでどうぞ。

github.com

yamlファイルを手元にもってきてlimactl startのときに指定するだけでインスタンスが立ち上がり、dockerデーモンのセットアップもしてくれる。

$ limactl start /path/to/docker-vm.yaml

あとは環境変数DOCKER_HOSTを設定してcentos7のコンテナをdocker runするだけ。 これでsystemdを利用できる。

$ export DOCKER_HOST='tcp://127.0.0.1:2375'

$ docker run -itd --privileged --name centos7 centos:7 /sbin/init
cadb0f349dc55d7d398b51398f3a411d8e94fcadf8b4499b9d2fb4050d2602d1

$ docker exec -it centos7 systemctl status
● cadb0f349dc5
    State: starting
     Jobs: 6 queued
   Failed: 0 units
    Since: Tue 2022-01-18 02:56:21 UTC; 10s ago
   CGroup: /docker/cadb0f349dc55d7d398b51398f3a411d8e94fcadf8b4499b9d2fb4050d260
2d1
           ├─1 /sbin/init
           └─system.slice
             ├─systemd-udevd.service
             │ └─32 /usr/lib/systemd/systemd-udevd
             ├─systemd-journald.service
             │ └─21 /usr/lib/systemd/systemd-journald
             ├─dbus.service
             │ └─60 /usr/bin/dbus-daemon --system --address=systemd: --nofork --nop
idfile --systemd-activation
             ├─system-getty.slice
             │ └─getty@tty1.service
             │   └─69 (agetty)
             └─systemd-logind.service
               └─65 /usr/lib/systemd/systemd-logind

作成したyamlファイルのポイント

limaではlimactl startするだけでインスタンスが起動してくれるが、デフォルトの設定をそのまま使っても求める環境は構築できない。 以下ポイントを2点ほどまとめた。

ポイント1:limaインスタンスのOSはRocky Linux 8.5を採用

デフォルトで起動するインスタンスUbuntu 21.10だが、cgroup v2が使われているので今回のケースだとNG。

<user>@lima-default:~$ grep PRETTY_NAME /etc/os-release
PRETTY_NAME="Ubuntu 21.10"
<user>@lima-default:~$
<user>@lima-default:~$ journalctl --version
systemd 248 (248.3-1ubuntu8.2)
+PAM +AUDIT +SELINUX +APPARMOR +IMA +SMACK +SECCOMP +GCRYPT +GNUTLS -OPENSSL +ACL +BLKID +CURL +ELFUTILS -FIDO2 +IDN2 -IDN +IPTC +KMOD +LIBCRYPTSETUP -LIBFDISK +PCRE2 -PWQUALITY -P11KIT -QRENCODE +BZIP2 +LZ4 +XZ +ZLIB +ZSTD -XKBCOMMON +UTMP +SYSVINIT default-hierarchy=unified
<user>@lima-default:~$
<user>@lima-default:~$ mount | grep cgroup
cgroup2 on /sys/fs/cgroup type cgroup2 (rw,nosuid,nodev,noexec,relatime,nsdelegate,memory_recursiveprot)
<user>@lima-default:~$

docker clientのinfoからも確認できる。

$ docker info | grep -E "Cgroup Driver:|Cgroup Version:|Operating System:"
 Cgroup Driver: systemd
 Cgroup Version: 2
 Operating System: Ubuntu 21.10

Rocky Linux 8.5はcgroup v1なのでOK。 limaのリポジトリRocky Linuxのサンプルyamlが公開されていたのでこれを利用することにした。 cgroup v1が使われているOSならRocky Linuxじゃなくてもいけるはず。

[<user>@lima-docker-vm ~]$ cat /etc/redhat-release
Rocky Linux release 8.5 (Green Obsidian)
[<user>@lima-docker-vm ~]$
[<user>@lima-docker-vm ~]$ journalctl --version
systemd 239 (239-51.el8)
+PAM +AUDIT +SELINUX +IMA -APPARMOR +SMACK +SYSVINIT +UTMP +LIBCRYPTSETUP +GCRYPT +GNUTLS +ACL +XZ +LZ4 +SECCOMP +BLKID +ELFUTILS +KMOD +IDN2 -IDN +PCRE2 default-hierarchy=legacy
[<user>@lima-docker-vm ~]$
[<user>@lima-docker-vm ~]$
[root@base000 current]# mount | grep cgroup
tmpfs on /sys/fs/cgroup type tmpfs (ro,nosuid,nodev,noexec,seclabel,mode=755)
cgroup on /sys/fs/cgroup/systemd type cgroup (rw,nosuid,nodev,noexec,relatime,seclabel,xattr,release_agent=/usr/lib/systemd/systemd-cgroups-agent,name=systemd)

...

[<user>@lima-docker-vm ~]$

docker clientのinfoからも確認できる。

$ docker info | grep -E "Cgroup Driver:|Cgroup Version:|Operating System:"
 Cgroup Driver: cgroupfs
 Cgroup Version: 1
 Operating System: Rocky Linux 8.5 (Green Obsidian)

上記を踏まえてRocky Linux 8.5を採用した。 yamlの該当部分はこんなかんじ。 まずはローカルにOSイメージが無いかを探して、なければ指定されたURLからOSイメージをダウンロードするようになっている。

images:
# Try to use a local image first.
- location: "~/Downloads/Rocky-8-GenericCloud-8.5-20211114.2.x86_64.qcow2"
  arch: "x86_64"
- location: "~/Downloads/Rocky-8-GenericCloud-8.5.20211114.1.aarch64.qcow2"
  arch: "aarch64"


# Download the file from the internet when the local file is missing.
# Hint: run `limactl prune` to invalidate the "current" cache
- location: "https://dl.rockylinux.org/pub/rocky/8.5/images/Rocky-8-GenericCloud-8.5-20211114.2.x86_64.qcow2"
  arch: "x86_64"
  digest: "sha256:c23f58f26f73fb9ae92bfb4cf881993c23fdce1bbcfd2881a5831f90373ce0c8"
- location: "https://dl.rockylinux.org/pub/rocky/8.5/images/Rocky-8-GenericCloud-8.5.20211114.1.aarch64.qcow2"
  arch: "aarch64"
  digest: "sha256:f13cfa7b5e449cc165181a1efbea5b1cdce73ef6a5d6bb24c22b50f67f1f8fe2"

ポイント2:provisionを活用する

インスタンスただ作成するだけではMacOSからlimaインスタンス上のdockerデーモンは利用できない。 というかデフォルトだとlimaインスタンスにdockerは入ってない。 さらにdockerのデーモンはlimaで構築したインスタンス上で動いているので、ただインストールするだけではMacOS側のdocker clientを実行してもエラーがでる。 docker clientからlima上のdockerデーモンを利用できるように更に設定を追加する必要がある。

ref : https://docs.docker.jp/config/daemon/daemon.html

インスタンスを構築した後にいちいち設定するのは面倒なのでprovisionを利用した。

provision:
# `system` is executed with the root privilege
  - mode: system
    script: |
      #!/bin/bash
      yum-config-manager --add-repo https://download.docker.com/linux/centos/docker-ce.repo
      yum install -y docker-ce docker-ce-cli containerd.io
      mkdir -p /etc/systemd/system/docker.service.d/
      cat <<EOF > /etc/systemd/system/docker.service.d/docker.conf
      [Service]
      ExecStart=
      ExecStart=/usr/bin/dockerd -H tcp://127.0.0.1:2375 -H unix:///var/run/docker.sock
      EOF
      systemctl daemon-reload
      systemctl start docker
limaを使ってみた

Docker Desktopの一部有償化を受けてlimaとdockerを組み合わせて利用する場面が増えているっぽい。 ということでlimaを触ってみることにした。 今回はlimaの基本的な使い方だけ。 dockerと組み合わせた活用方法はまた後で。

limaとは?

MacOSの環境でLinuxVMを提供するソフトウェア。 containerd + nerdctlな環境をMacユーザに提供することが目的で開発されている。

github.com

limaをインストールする

homebrewで入れるだけでOK。

brew install lima

sampleという名前でインスタンスを起動する

lima start <インスタンス名>と実行する。 インスタンス名を入れない場合はdefaultというインスタンス名になる。

$ limactl start sample

? Creating an instance "sample"  [Use arrows to move, type to filter]
> Proceed with the default configuration
  Open an editor to override the configuration
  Exit

ここでconfigに関する選択肢が表示される。 このconfigでディストリビューションを指定したり、instanceに割り当てるリソースを指定したりできる。

  • Proceed with the default configuration:デフォルトのconfigをそのまま利用する
  • Open an editor to override the configuration:デフォルトをベースにconfigをカスタマイズする

今回はcpus:4→2に変更して起動してみる。 Open an editor to override the configurationを選択するとエディタが起動してyamlの編集画面に入るので、そこで cpusの値を変更すればOK。 yamlの編集を終えるとインスタンスが起動する。

INFO[0179] Attempting to download the image from "~/Downloads/impish-server-cloudimg-amd64.img"  digest=
INFO[0179] Attempting to download the image from "https://cloud-images.ubuntu.com/impish/current/impish-server-cloudimg-amd64.img"  digest=
INFO[0179] Using cache "/Users/<user>/Library/Caches/lima/download/by-url-sha256/ac74da77a6828e35de7edaa06fdbb33d12ef97cce2726550017e3c1066c88fb1/data"
INFO[0179] Attempting to download the nerdctl archive from "https://github.com/containerd/nerdctl/releases/download/v0.15.0/nerdctl-full-0.15.0-linux-amd64.tar.gz"  digest="sha256:ca40d99d257e69f0220bb1cbdab1b602032692f45f713c901f328d2f4e3c12b3"
INFO[0179] Using cache "/Users/<user>/Library/Caches/lima/download/by-url-sha256/0528f21ffeedfade0c993f8323bdfb5b26dfbdc7c67702a5188ca25c15d755a1/data"
INFO[0181] [hostagent] Starting QEMU (hint: to watch the boot progress, see "/Users/<user>/.lima/sample/serial.log")
INFO[0181] SSH Local Port: 64937
INFO[0181] [hostagent] Waiting for the essential requirement 1 of 5: "ssh"
INFO[0209] [hostagent] Waiting for the essential requirement 1 of 5: "ssh"
INFO[0235] [hostagent] The essential requirement 1 of 5 is satisfied
INFO[0235] [hostagent] Waiting for the essential requirement 2 of 5: "user session is ready for ssh"
INFO[0235] [hostagent] The essential requirement 2 of 5 is satisfied
INFO[0235] [hostagent] Waiting for the essential requirement 3 of 5: "sshfs binary to be installed"
INFO[0250] [hostagent] The essential requirement 3 of 5 is satisfied
INFO[0250] [hostagent] Waiting for the essential requirement 4 of 5: "/etc/fuse.conf to contain \"user_allow_other\""
INFO[0290] [hostagent] Waiting for the essential requirement 4 of 5: "/etc/fuse.conf to contain \"user_allow_other\""
INFO[0290] [hostagent] The essential requirement 4 of 5 is satisfied
INFO[0290] [hostagent] Waiting for the essential requirement 5 of 5: "the guest agent to be running"
INFO[0290] [hostagent] The essential requirement 5 of 5 is satisfied
INFO[0290] [hostagent] Mounting "/Users/<user>"
INFO[0291] [hostagent] Mounting "/tmp/lima"
INFO[0291] [hostagent] Waiting for the optional requirement 1 of 2: "systemd must be available"
INFO[0291] [hostagent] Forwarding "/run/lima-guestagent.sock" (guest) to "/Users/<user>/.lima/sample/ga.sock" (host)
INFO[0291] [hostagent] The optional requirement 1 of 2 is satisfied
INFO[0291] [hostagent] Not forwarding TCP 127.0.0.53:53
INFO[0291] [hostagent] Not forwarding TCP 0.0.0.0:22
INFO[0291] [hostagent] Waiting for the optional requirement 2 of 2: "containerd binaries to be installed"
INFO[0291] [hostagent] Not forwarding TCP [::]:22
INFO[0291] [hostagent] The optional requirement 2 of 2 is satisfied
INFO[0291] [hostagent] Waiting for the final requirement 1 of 1: "boot scripts must have finished"
INFO[0306] [hostagent] The final requirement 1 of 1 is satisfied
INFO[0306] READY. Run `limactl shell sample` to open the shell.

ちなみに:yamlのサンプルが公開されている

yamlの例は https://github.com/lima-vm/lima/tree/master/examples にある。カスタマイズするときに参考にすると良さそう。

起動したインスタンスを確認する

limactl listインスタンスの一覧を見ることができる。 CPUSが2の状態で起動できていることがわかる。

$ limactl list
NAME      STATUS     SSH                ARCH      CPUS    MEMORY    DISK      DIR
sample    Running    127.0.0.1:64937    x86_64    2       4GiB      100GiB    /Users/<user>/.lima/sample

DIRの項目から察しが付くかもしれないが、~/.lima/sample配下にインスタンスに関するファイル群が置かれている。 ちなみにこの中にあるlima.yamlインスタンスのconfigを表したyamlファイルである。 上述のdefault.yamlを比較してみるとよい。

$ ls -l ~/.lima/sample
total 3283640
-rw-r--r--  1 <user>  staff  582221824  1 10 20:59 basedisk
-rw-r--r--  1 <user>  staff  208906240  1 10 20:59 cidata.iso
-rw-r--r--  1 <user>  staff  876937216  1 10 21:11 diffdisk
srw-------  1 <user>  staff          0  1 10 21:01 ga.sock
-rw-r--r--  1 <user>  staff          6  1 10 20:59 ha.pid
srwxr-xr-x  1 <user>  staff          0  1 10 20:59 ha.sock
-rw-r--r--  1 <user>  staff      20510  1 10 21:02 ha.stderr.log
-rw-r--r--  1 <user>  staff        167  1 10 21:02 ha.stdout.log
-rw-r--r--  1 <user>  staff      12093  1 10 20:59 lima.yaml
-rw-------  1 <user>  staff          6  1 10 20:59 qemu.pid
srwxr-xr-x  1 <user>  staff          0  1 10 20:59 qmp.sock
-rw-r--r--  1 <user>  staff     111127  1 10 21:02 serial.log
srwxr-xr-x  1 <user>  staff          0  1 10 20:59 serial.sock
srw-------  1 <user>  staff          0  1 10 21:00 ssh.sock

shellを起動する

limactl shell <インスタンス名>でlimaのshellを起動できる。

$ limactl shell sample
<user>@lima-sample:/Users/<user>$ ls -l
total 49324
drwx------ 1 <user> dialout       96 Sep  7  2020  Applications
drwx------ 1 <user> dialout      704 Dec  7 01:52  Desktop
drwx------ 1 <user> dialout      160 Oct  4 05:56  Documents

...

limactl shell <インスタンス名> <コマンド>とすればインスタンスに入らなくてもコマンドを実行できる。

$ limactl shell sample ls -l
<user>@lima-sample:/Users/<user>$ ls -l
total 49324
drwx------ 1 <user> dialout       96 Sep  7  2020  Applications
drwx------ 1 <user> dialout      704 Dec  7 01:52  Desktop
drwx------ 1 <user> dialout      160 Oct  4 05:56  Documents

...

lsの結果の通り、MacOS上のホームディレクトリがreadonlyでボリュームマウントされるっぽい。 yamlでもそのように定義されている。 一応書き込み権限は変更できるがyamlのコメントuntested and dangerousの通りやめておいたほうが良さそう。

$ cat /Users/<user>/.lima/sample/lima.yaml
# ===================================================================== #
# BASIC CONFIGURATION
# ===================================================================== #

...

# Expose host directories to the guest, the mount point might be accessible from all UIDs in the guest
# Default: none
mounts:
  - location: "~"
    # CAUTION: `writable` SHOULD be false for the home directory.
    # Setting `writable` to true is possible, but untested and dangerous.
    writable: false
  - location: "/tmp/lima"
    writable: true

ちなみに:limaというlima shell defaultへのエイリアスがある

defaultというインスタンスで起動している場合はlimaというエイリアスでshellを起動できる。 もしくは環境変数LIMA_INSTANCE=<インスタンス名>をセットすれば他のインスタンスでもエイリアスを利用可能。

$ lima --help
Usage: lima [COMMAND...]

lima is an alias for "limactl shell default".
The instance name ("default") can be changed by specifying $LIMA_INSTANCE.

See `limactl shell --help` for further information.
$ LIMA_INSTANCE=sample lima uname -n;
lima-sample

nerdctlでコンテナを起動してみる

nerdctlでnginxコンテナを起動してみる。

$ limactl shell sample nerdctl run -d --name nginx -p 127.0.0.1:8080:80 nginx:alpine
docker.io/library/nginx:alpine:                                                   resolved       |++++++++++++++++++++++++++++++++++++++|
index-sha256:eb05700fe7baa6890b74278e39b66b2ed1326831f9ec3ed4bdc6361a4ac2f333:    done           |++++++++++++++++++++++++++++++++++++++|
manifest-sha256:544ba2bfe312bf2b13278495347bb9381ec342e630bcc8929af124f1291784bb: done           |++++++++++++++++++++++++++++++++++++++|
config-sha256:cc44224bfe208a46fbc45471e8f9416f66b75d6307573e29634e7f42e27a9268:   done           |++++++++++++++++++++++++++++++++++++++|
layer-sha256:40e5d2fe5bcd566dbde3e961f33ced0f1503fc6ee320a427b185a07afe2f96ae:    done           |++++++++++++++++++++++++++++++++++++++|
layer-sha256:59bf1c3509f33515622619af21ed55bbe26d24913cedbca106468a5fb37a50c3:    done           |++++++++++++++++++++++++++++++++++++++|
layer-sha256:f3322597df46099a66ed5773c10a9d1cb587faca7be14ceba985e3d1fbfdbc36:    done           |++++++++++++++++++++++++++++++++++++++|
layer-sha256:d09cf91cabdcf5f64672598b8e4da9b0b7d8546e83ec49633bdd92abb994ba61:    done           |++++++++++++++++++++++++++++++++++++++|
layer-sha256:3a97535ac2efcf94ab3e5f93a6ec4d934469de66909f17ba1229f86ee660970a:    done           |++++++++++++++++++++++++++++++++++++++|
layer-sha256:919ade35f869e23d663ea51fdf2e99aa183239a73b4b4780e052c8b248ed5b7e:    done           |++++++++++++++++++++++++++++++++++++++|
elapsed: 10.6s                                                                    total:  9.7 Mi (937.8 KiB/s)                       
449379ddeb21602e71e198fa34ab54058767027f50b9fede47060566e0c67bf7

$ limactl shell sample nerdctl ps
CONTAINER ID    IMAGE                             COMMAND                   CREATED          STATUS    PORTS                     NAMES
449379ddeb21    docker.io/library/nginx:alpine    "/docker-entrypoint.…"    3 minutes ago    Up        127.0.0.1:8080->80/tcp    nginx

ホストからcurlするとnginxコンテナへ接続できることが確認できる。

$ curl --head 127.0.0.1:8080
HTTP/1.1 200 OK
Server: nginx/1.21.5
Date: Mon, 10 Jan 2022 13:12:50 GMT
Content-Type: text/html
Content-Length: 615
Last-Modified: Tue, 28 Dec 2021 18:48:00 GMT
Connection: keep-alive
ETag: "61cb5be0-267"
Accept-Ranges: bytes

インスタンスの停止

lima stop <インスタンス名>でOK。

$ limactl stop sample
INFO[0000] Sending SIGINT to hostagent process 85032
INFO[0000] Waiting for the host agent and the qemu processes to shut down
INFO[0000] [hostagent] Received SIGINT, shutting down the host agent
INFO[0000] [hostagent] Shutting down the host agent
INFO[0000] [hostagent] Stopping forwarding "/run/lima-guestagent.sock" (guest) to "/Users/<user>/.lima/sample/ga.sock" (host)
INFO[0000] [hostagent] Unmounting "/Users/<user>"
INFO[0000] [hostagent] Unmounting "/tmp/lima"
INFO[0000] [hostagent] Shutting down QEMU with ACPI
INFO[0000] [hostagent] Sending QMP system_powerdown command
INFO[0001] [hostagent] QEMU has exited
$ limactl list
NAME      STATUS     SSH            ARCH      CPUS    MEMORY    DISK      DIR
sample    Stopped    127.0.0.1:0    x86_64    2       4GiB      100GiB    /Users/<user>/.lima/sample

今回はここまで。 次回はlima + dockerのことを書こうかな。

iptablesでdockerコンテナへのアクセスを制限するときはDOCKER-USER chainを使う

iptablesを使っている環境でdockerコンテナを立ち上げたら、アクセス許可をするルールを追加してないのに外部からアクセスできてしまうという出来事があった。調べてみたらこのドキュメントを見つけた。

Docker and iptables | Docker Documentation

By default, all external source IPs are allowed to connect to the Docker host. To allow only a specific IP or network to access the containers, insert a negated rule at the top of the DOCKER-USER filter chain.

dockerによって外部IPからのアクセスを全て許可するようにルールが自動で追加されるということだ。 例えばiptablesを使っている環境でnginxのコンテナを立ち上げると、dockerによって外部IPからアクセスできるようにDOCKERというchainにルールが自動追加される。 もしアクセス制限をかけたい場合はDOCKER-USERというchainにルールを追加する必要がある。

実際に試してみる

VagrantでCentOS7な環境を用意してそこでnginxコンテナを起動してみる。

nginxコンテナを起動すると自動でルールが追加されている

コンテナを起動していない状態ではDOCKERchainには何も追加されていない。

[vagrant@centos7 ~]$ sudo docker ps
CONTAINER ID   IMAGE     COMMAND   CREATED   STATUS    PORTS     NAMES
[vagrant@centos7 ~]$
[vagrant@centos7 ~]$ sudo iptables -L DOCKER
Chain DOCKER (1 references)
target     prot opt source               destination
[vagrant@centos7 ~]$

nginxのコンテナを起動してみる。

[vagrant@centos7 ~]$ sudo docker run -d --rm --name nginx -p 80:80 nginx:latest
ed01522e7ee85681bf2a6271576613200947df778f4af4ba8df3180b4966423c
[vagrant@centos7 ~]$
[vagrant@centos7 ~]$ sudo docker ps
CONTAINER ID   IMAGE          COMMAND                  CREATED         STATUS         PORTS                NAMES
ed01522e7ee8   nginx:latest   "/docker-entrypoint.…"   3 seconds ago   Up 2 seconds   0.0.0.0:80->80/tcp   nginx
[vagrant@centos7 ~]$

するとDOCKERchainに172.17.0.2:80宛のアクセスを許可するルールが追加されている。 ちなみに172.17.0.2はコンテナに割り当てられているIPアドレス。 natテーブルをみると、PREROUTINGchainから転送される形でDOCKERchainにホスト(Vagrant環境)の80ポート宛のアクセスを172.17.0.2:80宛にnatするためのルールが追加されていることがわかる。

[vagrant@centos7 ~]$ sudo iptables -L DOCKER
Chain DOCKER (1 references)
target     prot opt source               destination
ACCEPT     tcp  --  anywhere             172.17.0.2           tcp dpt:http
[vagrant@centos7 ~]$
[vagrant@centos7 ~]$ sudo iptables -L -t nat
Chain PREROUTING (policy ACCEPT)
target     prot opt source               destination
PREROUTING_direct  all  --  anywhere             anywhere
PREROUTING_ZONES_SOURCE  all  --  anywhere             anywhere
PREROUTING_ZONES  all  --  anywhere             anywhere
DOCKER     all  --  anywhere             anywhere             ADDRTYPE match dst-type LOCAL

...

Chain DOCKER (2 references)
target     prot opt source               destination
RETURN     all  --  anywhere             anywhere
DNAT       tcp  --  anywhere             anywhere             tcp dpt:http to:172.17.0.2:80

...

[vagrant@centos7 ~]$
[vagrant@centos7 ~]$ sudo docker network inspect bridge
[
    {
...
        "Containers": {
            "ed01522e7ee85681bf2a6271576613200947df778f4af4ba8df3180b4966423c": {
                "Name": "nginx",
                "EndpointID": "c5e4775c43de4e80355a24a4f1be4b7fc91969236fcf53dbb0bdb47054f764d6",
                "MacAddress": "02:42:ac:11:00:02",
                "IPv4Address": "172.17.0.2/16",
                "IPv6Address": ""
            }
...
    }
]
[vagrant@centos7 ~]$

この状態でホスト(Vagrant環境)の外からcurlを実行すると200が返ってくる。

$ curl --head localhost
HTTP/1.1 200 OK
Server: nginx/1.21.5
Date: Fri, 31 Dec 2021 06:21:54 GMT
Content-Type: text/html
Content-Length: 615
Last-Modified: Tue, 28 Dec 2021 15:28:38 GMT
Connection: keep-alive
ETag: "61cb2d26-267"
Accept-Ranges: bytes

INPUTchainにルールを入れても制限はできない

PREROUTINGにnatするためのルールが追加されているので、INPUT chainにDROPするルールを追加しても効果はなく外からアクセスできてしまう。

[vagrant@centos7 ~]$ sudo iptables -I INPUT -p tcp -m tcp --dport 80 -j DROP
[vagrant@centos7 ~]$
[vagrant@centos7 ~]$ sudo iptables -L INPUT
Chain INPUT (policy ACCEPT)
target     prot opt source               destination
DROP       tcp  --  anywhere             anywhere             tcp dpt:http
ACCEPT     all  --  anywhere             anywhere             ctstate RELATED,ESTABLISHED
ACCEPT     all  --  anywhere             anywhere

...
$ curl localhost
HTTP/1.1 200 OK
Server: nginx/1.21.5
Date: Fri, 31 Dec 2021 06:35:46 GMT
Content-Type: text/html
Content-Length: 615
Last-Modified: Tue, 28 Dec 2021 15:28:38 GMT
Connection: keep-alive
ETag: "61cb2d26-267"
Accept-Ranges: bytes

DOCKER-USERというchainにルールを挿入すれば制限をかけられる

冒頭に書いたとおり、アクセス制限をかけたいときはDOCKER-USERというchainにルールを挿入すればOK。

何もルールを追加していない状態だとこうなっている。 FORWARDchainの先頭にDOCKER-USERchainが挿入されている。

[vagrant@centos7 ~]$ sudo iptables -L DOCKER-USER
Chain DOCKER-USER (1 references)
target     prot opt source               destination
RETURN     all  --  anywhere             anywhere
[vagrant@centos7 ~]$
[vagrant@centos7 ~]$
[vagrant@centos7 ~]$ sudo iptables -L FORWARD
Chain FORWARD (policy DROP)
target     prot opt source               destination
DOCKER-USER  all  --  anywhere             anywhere
DOCKER-ISOLATION-STAGE-1  all  --  anywhere             anywhere
ACCEPT     all  --  anywhere             anywhere             ctstate RELATED,ESTABLISHED
DOCKER     all  --  anywhere             anywhere
ACCEPT     all  --  anywhere             anywhere
ACCEPT     all  --  anywhere             anywhere             ctstate RELATED,ESTABLISHED
ACCEPT     all  --  anywhere             anywhere
FORWARD_direct  all  --  anywhere             anywhere
FORWARD_IN_ZONES_SOURCE  all  --  anywhere             anywhere
FORWARD_IN_ZONES  all  --  anywhere             anywhere
FORWARD_OUT_ZONES_SOURCE  all  --  anywhere             anywhere
FORWARD_OUT_ZONES  all  --  anywhere             anywhere
DROP       all  --  anywhere             anywhere             ctstate INVALID
REJECT     all  --  anywhere             anywhere             reject-with icmp-host-prohibited
[vagrant@centos7 ~]$

DOCKER-USERに80ポートへのアクセスをDROPするルールを追加する。

[vagrant@centos7 ~]$ sudo iptables -I DOCKER-USER -p tcp -m tcp --dport 80 -j DROP
[vagrant@centos7 ~]$
[vagrant@centos7 ~]$ sudo iptables -L DOCKER-USER
Chain DOCKER-USER (1 references)
target     prot opt source               destination
DROP       tcp  --  anywhere             anywhere             tcp dpt:http
RETURN     all  --  anywhere             anywhere
[vagrant@centos7 ~]$

アクセス制限をかけられていることを確認できた。

$ curl --head localhost
curl: (56) Recv failure: Connection reset by peer

ちなみにDOCKER-USERSchainではなくFORWARDchainにルールを追加しても同じことができる。 でもFORWARDchainに直接書くと傍から見たらdocker用のアクセス制限であることがわかりにくいので、ドキュメントどおりにDOCKER-USERchainにルールを足したほうが良いだろう。


というわけで、iptablesを使っている環境でコンテナを立ち上げる場合は、DOCKER-USERchainにアクセス制限をかけるためのルールを追加することをお忘れなく。

GithubのAPIを利用してタグの一覧を取得してみる

https://api.github.com/repos/<org>/<repository>/tagsへ向けてcurlを叩くとタグに関する情報を取得できる。 json形式で出力されるのでjqコマンドなどで整形するとなにかに活用できるかも。

例)puppetlabs-stdlibのバージョン一覧を取得する

GitHub - puppetlabs/puppetlabs-stdlib: Puppet Labs Standard Library module

curl -s https://api.github.com/repos/puppetlabs/puppetlabs-stdlib/tags | jq -r ".[].name"
v8.1.0
v8.0.0
v7.1.0
v7.0.1
v7.0.0
v6.6.0
v6.5.0
v6.4.0
v6.3.0
v6.2.0
v6.1.0
v6.0.0
v2.2.1
v2.2.0
v2.1.2
v2.1.1
v2.1.0
v2.0.0
v1.1.0
v1.0.0
v0.1.7
5.2.0
5.1.0
5.0.0
4.25.1
4.25.0
4.24.0
4.23.0
4.22.0
4.21.0

githubコンテキストでActionsのURLを表現する

Github Actionsで実行したCIの結果をslackに通知するときに、ActionsのURLも含めたいと考えていた。 環境変数を使うか採用するアクションのREADMEに沿えばよいのだが、いろいろ調べていたらgithubコンテキストでも表現できる方法を見つけた。

方法1:github.event.repository.urlを使う

https://github.com/tokorom/action-slack-incoming-webhook のREADMEではgithub.event.repository.urlを使っていた。

${{ github.event.repository.url }}/actions/runs/${{ github.run_id }}

方法2:github.server_urlとgithub.repositoryを組み合わせる

https://github.community/t/get-runs-url/16921/5 には、github.server_urlとgithub.repositoryを組み合わせる方法が書いてあった。

${{ github.server_url }}/${{ github.repository }}/actions/runs/${{ github.run_id }}

GitHub Actions のコンテキストおよび式の構文 - GitHub Docs によると、ほとんどの環境変数githubコンテキストで表現できるらしい。 なので $GITHUB_SERVER_URL/$GITHUB_REPOSITORY/actions/runs/$GITHUB_RUN_ID と等価なのだろう。

せっかくなので通知例も

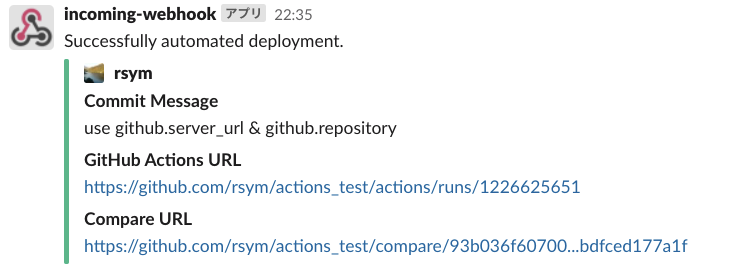
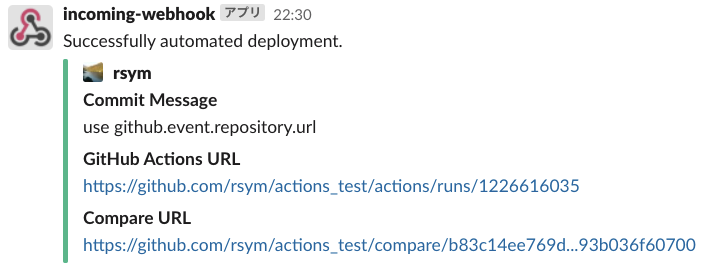
文章だけなのもアレなので実際に通知させてみた。 通知内容自体はどちらも同じになる。

検証方法

github.event.repository.urlを使う場合

コード抜粋("title": "GitHub Actions URL"の部分が検証ポイント)

    steps:
      - uses: actions/checkout@v2
      - name: Slack Notification
        if: success()
        uses: tokorom/action-slack-incoming-webhook@main
        env:
          INCOMING_WEBHOOK_URL: ${{ secrets.SLACK_WEBHOOK_URL }}
        with:
          text: Successfully automated deployment.
          attachments: |
            [
              {
                "color": "good",
                "author_name": "${{ github.actor }}",
                "author_icon": "${{ github.event.sender.avatar_url }}",
                "fields": [
                  {
                    "title": "Commit Message",
                    "value": "${{ github.event.head_commit.message }}"
                  },
                  {
                    "title": "GitHub Actions URL",
                    "value": "${{ github.event.repository.url }}/actions/runs/${{ github.run_id }}"
                  },
                  {
                    "title": "Compare URL",
                    "value": "${{ github.event.compare }}"
                  }
                ]
              }
            ]

f:id:rsym1290:20210912223133p:plain

github.server_urlとgithub.repositoryを使う場合

コード抜粋(diffのみ)

                  },
                  {
                    "title": "GitHub Actions URL",
-                    "value": "${{ github.event.repository.url }}/actions/runs/${{ github.run_id }}"
+                    "value": "${{ github.server_url }}/${{ github.repository }}/actions/runs/${{ github.run_id }}"
                  },
                  {
                    "title": "Compare URL",

f:id:rsym1290:20210912224005p:plain


もちろん環境変数でも良いのだが、コードの見栄え的に自分はgithubコンテキストのほうが好みかな。

MinIO Clientを使ってみた

3回連続でMinIOネタになっちゃった。

MinIOではmcというCLIを提供していることを知ったので試してみた。 詳しい使い方はこちらに書いてある。

MinIO | MinIO Client Quickstart Guide

事前準備:Minio Serverを起動しておく

dockerを用いて手元にMinIO Serverを立てておく。 詳しくは過去記事 MinIOを触ってみた - rsym’s diary を参照。今回の記事ではここへ向けてmcを実行する。

$ docker run -d --name minio_container -p 9000:9000 minio/minio server /data
fc35d67f860df59715922eb1dff6ed60c8d1f8941d59032a1064907796883848

$ docker ps -f name=minio_container
CONTAINER ID   IMAGE         COMMAND                  CREATED          STATUS          PORTS                                       NAMES
fc35d67f860d   minio/minio   "/usr/bin/docker-ent…"   33 seconds ago   Up 31 seconds   0.0.0.0:9000->9000/tcp, :::9000->9000/tcp   minio_container

MinIO Clientのインストール

Mac(Homebrew)、Linux(Binary)、Windows(Binary)、Dockerといろんな環境で利用できるように用意されている。 goで記述されたソースからインストールすることもできる。 今回はMac(Homebrew)を利用してみる。

$ brew install minio/stable/mc

エイリアスの設定

次に、エンドポイントやアクセスキーなどの情報にエイリアスを付与する。 mcではエイリアスを用いてオブジェクトストレージへアクセスする。

コマンドの構文は以下の通り。

mc alias set <ALIAS> <YOUR-S3-ENDPOINT> <YOUR-ACCESS-KEY> <YOUR-SECRET-KEY> --api <API-SIGNATURE> --path <BUCKET-LOOKUP-TYPE>

実際に設定してみる。 デフォルトのアクセスキーでMinio Serverを起動したので、アクセスキーはminioadmin:minioadminである。

$ mc alias set minio http://127.0.0.1:9000 minioadmin minioadmin
mc: Configuration written to `/Users/<username>/.mc/config.json`. Please update your access credentials.
mc: Successfully created `/Users/<username>/.mc/share`.
mc: Initialized share uploads `/Users/<username>/.mc/share/uploads.json` file.
mc: Initialized share downloads `/Users/<username>/.mc/share/downloads.json` file.
Added `minio` successfully.

エイリアス~/.mc/config.jsonというファイルにjsonで出力される。 上記コマンドで設定したエイリアスminioという名前で記述されている。 minio以外にも、gcslocalplays3という4つのエイリアスがデフォルトで記述されている。 エイリアスを設定しておけば、GCSやS3でmcを利用することもできる。

$ cat ~/.mc/config.json
{
        "version": "10",
        "aliases": {
                "gcs": {
                        "url": "https://storage.googleapis.com",
                        "accessKey": "YOUR-ACCESS-KEY-HERE",
                        "secretKey": "YOUR-SECRET-KEY-HERE",
                        "api": "S3v2",
                        "path": "dns"
                },
                "local": {
                        "url": "http://localhost:9000",
                        "accessKey": "",
                        "secretKey": "",
                        "api": "S3v4",
                        "path": "auto"
                },
                "minio": {    ⬅これが設定したエイリアス
                        "url": "http://127.0.0.1:9000",
                        "accessKey": "minioadmin",
                        "secretKey": "minioadmin",
                        "api": "s3v4",
                        "path": "auto"
                },
                "play": {
                        "url": "https://play.min.io",
                        "accessKey": "***********************",
                        "secretKey": "***********************",
                        "api": "S3v4",
                        "path": "auto"
                },
                "s3": {
                        "url": "https://s3.amazonaws.com",
                        "accessKey": "YOUR-ACCESS-KEY-HERE",
                        "secretKey": "YOUR-SECRET-KEY-HERE",
                        "api": "S3v4",
                        "path": "dns"
                }
        }
}%

~/.mc/config.json以外に~/.mc/share/uploads.json~/.mc/share/downloads.jsonというファイルも生成されている。 これらはmcコマンドでアップロード・ダウンロード用の共有URLを生成したときに、そのURLが記録されるファイルのようだ。 download.jsonの出力例については後述する。

いろいろ実行してみる

各実行コマンドのminioの部分がエイリアスである。 <alias>/<bucket>/path/to/<object>というふうに記述することで、目的のバケット・オブジェクトを参照できる。

バケット作成

$ mc mb minio/sample-bucket
Bucket created successfully `minio/sample-bucket`.

オブジェクトのPUT

$ mc cp sample-object minio/sample-bucket/
 0 B / ?  ░░░░░░░░░░░░░░░░░░░░░░░░░░░░░░░░░░░░░░░░░░░░░░░░░░░░░░░░░░░░░░░░░░░░░░░░░░░░░░░░░░░░░░░░░░░░░░░░░░░░░░░░░░░░░░░░░░░░░░░░░▓

$ mc cp sample-object2 minio/sample-bucket/
 0 B / ?  ░░░░░░░░░░░░░░░░░░░░░░░░░░░░░░░░░░░░░░░░░░░░░░░░░░░░░░░░░░░░░░░░░░░░░░░░░░░░░░░░░░░░░░░░░░░░░░░░░░░░░░░░░░░░░░░░░░░░░░░░░▓

バケットとオブジェクトの参照

$ mc ls -r minio/
[2021-06-19 16:43:30 JST]     0B sample-bucket/sample-object
[2021-06-19 16:44:26 JST]     0B sample-bucket/sample-object2

特定のオブジェクトをダウンロードするための共有URLを生成

URLは~/.mc/share/downloads.jsonにも記録される。

$ mc share download minio/sample-bucket/sample-object
URL: http://127.0.0.1:9000/sample-bucket/sample-object
Expire: 7 days 0 hours 0 minutes 0 seconds
Share: http://127.0.0.1:9000/sample-bucket/sample-object?X-Amz-Algorithm=.....................

$ cat ~/.mc/share/downloads.json
{
        "version": "1",
        "shares": {
                "http://127.0.0.1:9000/sample-bucket/sample-object?X-Amz-Algorithm=.....................": {
                        "share": "http://127.0.0.1:9000/sample-bucket/sample-object",
                        "versionID": "",
                        "date": "2021-06-19T08:04:29.236446Z",
                        "expiry": 604800000000000
                }
        }
}%

ユーザ作成

ACCESSKEY:SAMPLEUSER、SECRETKEY:SAMPLEKEYとして生成する。

$ mc admin user add minio SAMPLEUSER SAMPLEKEY
Added user `SAMPLEUSER` successfully.

$ mc admin user list minio
enabled    SAMPLEUSER

使ってみての所感

S3だとs3cmdaws s3を利用することもあるが、これらのCLIと遜色ない使いやすさだと感じた。 brewで入れてaliasを入れればすぐに利用できるし、aliasがあることで複数のバケットを使い分けられるのも便利。 s3cmdaws s3でも使い分けはできるけど、mcのほうがよりコンパクトに記述できる点は個人的にいいなと感じた。

ただし、さすがにS3やGCSの全機能をカバーしているわけではなさそうなので(CloudFrontディストリビューションの利用とか)、S3/GCSのCLIの完全な代替えとまではいかなそう。 それでも使い勝手がかなりいいので、積極的に利用してみようかなと思った。

余談:MinIOの遊び環境

設定されているのエイリアスのうちplayというのは https://play.min.io/ という遊び環境として利用できるMinIO Serverへのエイリアスである。 バケット作成、オブジェクトのPUT/DELETE、ユーザ管理、など自由に利用できる。 とりあえずMinIOを触ってみたいという人は、この環境を活用するのも手だろう。

ただし、文字通り「遊び環境」であり、だれでも自由に利用できる環境である。 第三者が用意したバケットやオブジェクトなども参照できるし、自身が作成したものも第三者から参照できるのでその点は要注意。 たとえば mc ls playと実行するだけで既存バケットやオブジェクトを参照できる。 用途を限定した上で活用しよう。

MinIOをGithub Actionsで利用してみる

MinIOを触ってみた」という記事を書いてから、MinIOをなんかで利用できないかな〜と考えていた。 そんで「GitHub ActionsでMinIOを動かせれば、S3のAPIを利用したアプリケーションのCI/CDで役立つんじゃね?」と思ったので試してみることにした。

MinIOサーバを立てるためのコンテナがDocker Hubにあった

適当にぐぐってみると、同じことを考えている人はいるみたいで、すでにGitHub Actionsで利用することを想定したコンテナが作られていた。 ありがたや〜。

wktk/minio-server

というわけでこれを使うことにする。 Docker Hubを見ながらyamlを書くだけですんなり動いた。

Dockerfileを見ると最新のminioのコンテナを起動するという素直な内容なので、 minioのコンテナをつかってyamldocker runコマンドをベタ書きしても動くはず。 でもせっかく用意されているものがあるのなら使ってみようってことで。

aws-cliを利用してMinIO Serverにリクエストを投げてみる

Actions上でMinIO ServerにPUT/GETができるかも確認しておきたいところ。 ubuntu-latestならaws-cliが最初から入ってたりしないかな〜とおもって、ダメ元でyamlを書いたら実行できた。 というわけで最初から入ってるaws-cliを使うことにした。

GitHub Actionsでaws-cliを使うときの注意点

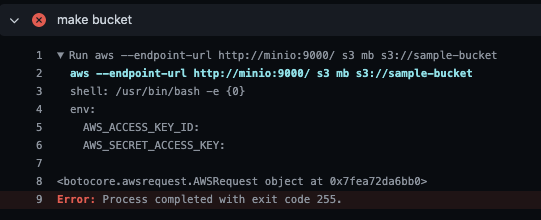
runで実行するコマンドを表現して、envにAWS_ACCESS_KEY_IDAWS_SECRET_ACCESS_KEYを指定すれば動くだろうと思ってたどそんなことはなかった。

f:id:rsym1290:20210423212127p:plain

調べてみて引っかかった記事がこれ。

GitHub Actions の AWS CLI がエラーで失敗するようになった場合の原因と対策

AWS_DEFAULT_REGIONAWS_EC2_METADATA_DISABLED: trueも明示する必要があるらしい。 そのとおりに書いたらこのエラーは解消した。

完成品

諸々を経て出来上がったコードがこちら。

name: minio-on-github-actions
on: [push]
jobs:
  build:
    runs-on: ubuntu-latest
    env:
      AWS_ACCESS_KEY_ID: ${{ secrets.AWS_ACCESS_KEY_ID }}
      AWS_SECRET_ACCESS_KEY: ${{ secrets.AWS_SECRET_ACCESS_KEY }}
      AWS_DEFAULT_REGION: us-east-1
      AWS_EC2_METADATA_DISABLED: true
    services:
      minio:
        image: wktk/minio-server
        ports:
          - 9000:9000
        env:
          MINIO_ACCESS_KEY: ${{ secrets.AWS_ACCESS_KEY_ID }}
          MINIO_SECRET_KEY: ${{ secrets.AWS_SECRET_ACCESS_KEY }}
    steps:
      - name: Add 127.0.0.1 minio to /etc/hosts
        run: echo "127.0.0.1 minio" | sudo tee -a /etc/hosts
      - name: make bucket
        run: aws --endpoint-url http://minio:9000/ s3 mb s3://sample-bucket
      - name: put object
        run: echo "sample-key" | aws --endpoint-url http://minio:9000/ s3 cp - s3://sample-bucket/sample/key
      - name: list objects
        run: aws --endpoint-url http://minio:9000/ s3 ls s3://sample-bucket/ --recursive

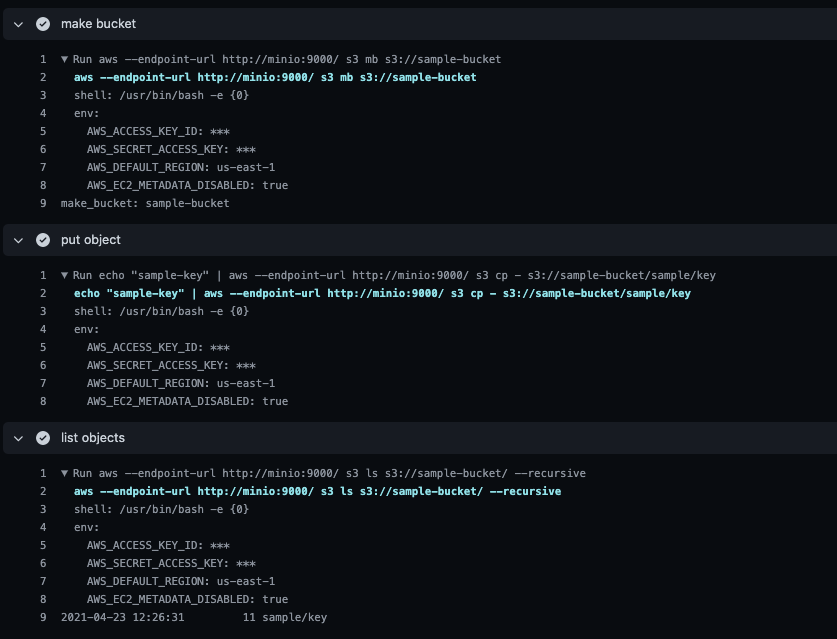
Actionsのログはこちら。 ちゃんとMinIO Serverが利用できていそう。

f:id:rsym1290:20210423212848p:plain

さいごに

MinIOをGitHub Actionsで活用してみた。MinIOではなくS3をGithub Actionsで利用する場合、バケットやIAMユーザを用意する必要があるだろう。 でもMinIOならそういうのを省いて手軽に利用できるところは大きなメリットだと思った。

今回はaws-cliを併用して検証したけど、 endpoint-urlを明示しておけばAWS SDK for Rubyなどの各APIでも利用できるはず。 自分もS3のAPIを利用できる(だいぶ雑に作った)簡易CLIを作ってるからそのテストで利用しようかな〜。